

Last Updated on 14/04/2026 by Alex
Welcome! Today, I will show you a complete guide on how to deploy FortiClient VPN and VPN profile settings via Microsoft Intune for Windows endpoints.
Prerequisites
- Basic understanding of Win32 application packaging
- Microsoft Intune license.
- Permissions to create applications within Microsoft Intune.
- Test device and user.
- Download FortiClient VPN only setup files
- Understanding of your FortiGate VPN details
Extracting the MSI file from the FortiClient installer
The first step to deploy FortiClient VPN is to exact the MSI file from the FortiClient installer, as you can see the installation from the vendor is a .exe file. Open the FortiClientVPNOnline.exe file on a test device (Do not install), wait until the following screen is present:
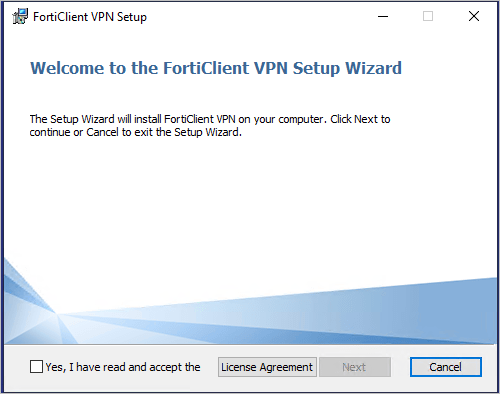
Without closing the above, browse to %localappdata%\Temp\<RandomGUID>, look for the latest folder, inside you should see the FortiClientVPN.msi file, copy this to a safe location:

You can now close the FortiClient VPN installer wizard.
Editing the MSI File
This section is entirely optional, I like to ensure that desktop shortcuts aren’t present when installing software, the FortiClientVPN.msi installer will do this by default. I will an MSI editor tool to remove the desktop shortcut, I use Master Packager but there are other tools out there.
Create the transform file
After opening the FortiClientVPN.msi within Master Packager, go to Transform, New Transform and save to a safe location.
Removing the Shortcut
Go to Shortcuts on the left-hand side and remove the Desktop shortcut:
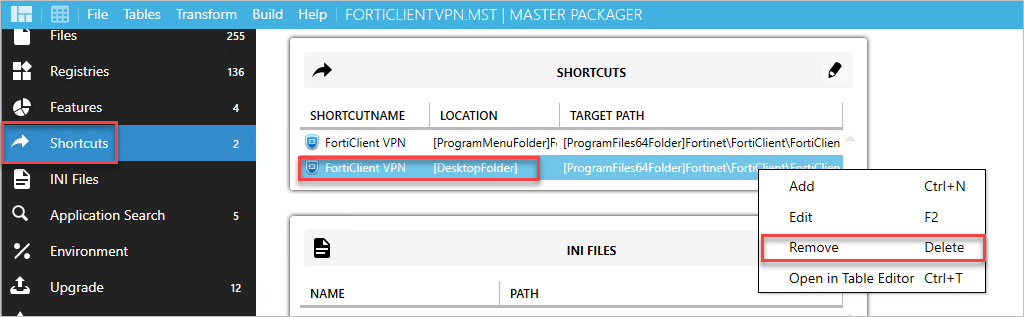
Save the .MST file with your changes and copy it to a safe location, alongside your FortiClientVPN.msi file, your directory should contain two files, these will be used to deploy FortiClient VPN:

Creating the Installer \ Uninstaller Scripts
We need to create the installer and Uninstaller scripts before we can wrap and upload the files to Microsoft Intune, these scripts will deploy FortiClient VPN and configure the VPN Profile.
Installation Script
For the sake of this demo, I am going to make up the VPN address, but this can be edited for your actual gateway address, the installation script is as follows (Save as InstallFortiClientandProfile.ps1):
# Restart Process using PowerShell 64-bit
If ($ENV:PROCESSOR_ARCHITEW6432 -eq "AMD64") {
    Try {
        &"$ENV:WINDIR\SysNative\WindowsPowershell\v1.0\PowerShell.exe" -File $PSCOMMANDPATH
    }
    Catch {
        Throw "Failed to start $PSCOMMANDPATH"
    }
    Exit
}
# Install FortiClient VPN
Start-Process Msiexec.exe -Wait -ArgumentList '/i FortiClientVPN.msi TRANSFORMS=FortiClientVPN.mst REBOOT=ReallySuppress /qn'
# Install VPN Profiles
if((Test-Path -LiteralPath "HKLM:\SOFTWARE\Fortinet\FortiClient\Sslvpn\Tunnels\LETSCONFIGMGRVPN") -ne $true) {  New-Item "HKLM:\SOFTWARE\Fortinet\FortiClient\Sslvpn\Tunnels\LETSCONFIGMGRVPN" -force -ea SilentlyContinue };
New-ItemProperty -LiteralPath 'HKLM:\SOFTWARE\Fortinet\FortiClient\Sslvpn\Tunnels\LETSCONFIGMGRVPN' -Name 'Description' -Value 'Lets ConfigMgr VPN' -PropertyType String -Force -ea SilentlyContinue;
New-ItemProperty -LiteralPath 'HKLM:\SOFTWARE\Fortinet\FortiClient\Sslvpn\Tunnels\LETSCONFIGMGRVPN' -Name 'Server' -Value 'demovpn.someaddress.com' -PropertyType String -Force -ea SilentlyContinue;
New-ItemProperty -LiteralPath 'HKLM:\SOFTWARE\Fortinet\FortiClient\Sslvpn\Tunnels\LETSCONFIGMGRVPN' -Name 'promptusername' -Value 1 -PropertyType DWord -Force -ea SilentlyContinue;
New-ItemProperty -LiteralPath 'HKLM:\SOFTWARE\Fortinet\FortiClient\Sslvpn\Tunnels\LETSCONFIGMGRVPN' -Name 'promptcertificate' -Value 0 -PropertyType DWord -Force -ea SilentlyContinue;
New-ItemProperty -LiteralPath 'HKLM:\SOFTWARE\Fortinet\FortiClient\Sslvpn\Tunnels\LETSCONFIGMGRVPN' -Name 'ServerCert' -Value '0' -PropertyType String -Force -ea SilentlyContinue;Let me break this down:
- Lines 2-9 – This restarts reruns the PowerShell script in 64-bit, if this is not present then the Intune management extension will run the process as 32-bit and the registry paths will appear in the WOW6432Node registry path instead, for which FortiClient VPN does not interrogate for it’s VPN settings.
- Line 12 – Installs the actual FortiClientVPN.msi with the transforms file that we created earlier silently without the desktop shortcut present.
- Lines 14 -19 – Configures the FortiClient VPN File, update the tunnel name LETSCONFIGMGRVPN to your own, this is purely the VPN profile name, update line 15 for the profile description, update line 16 for the gateway address (Note: If you have a custom port on the gateway address, then add a colon and then the port number (for example: ‘demovpn.someaddress.com:10443‘, and so on.
Uninstallation Script
To uninstall the FortiClient and the VPN profile, save the following script as UninstallFortiClientandProfile.ps1:
# Restart Process using PowerShell 64-bit
If ($ENV:PROCESSOR_ARCHITEW6432 -eq "AMD64") {
    Try {
        &"$ENV:WINDIR\SysNative\WindowsPowershell\v1.0\PowerShell.exe" -File $PSCOMMANDPATH
    }
    Catch {
        Throw "Failed to start $PSCOMMANDPATH"
    }
    Exit
}
# Stop FortiClient Process
Stop-Process -Name FortiClient -ErrorAction SilentlyContinue
# Uninstall FortiClient
Start-Process Msiexec.exe -wait -ArgumentList /'x {C0BEAA5B-4422-4FF8-B616-9F269C360290} REBOOT=ReallySuppress /qn'
# Remove FortiClient VPN Profiles
Remove-Item -LiteralPath "HKLM:\SOFTWARE\Fortinet\FortiClient\Sslvpn\Tunnels\LETSCONFIGMGRVPN" -force -ErrorAction SilentlyContinueAgain, I’ll break this down:
- Lines 2-9 – This restarts reruns the PowerShell script in 64-bit, if this is not present then the Intune management extension will run the process as 32-bit and the registry paths will not be deleted from the correct location.
- Line 12 – Uninstalls the FortiClient VPN silently with no reboots.
- Line 16 – Removes the FortiClient VPN profile, update the tunnel name (LETSCONFIGMGRVPN) so it removes the correct VPN profile.
Creating the Intunewim file format
I’m not going to go into huge detail here as I suspect that you all about the Win32 wrapping process required for Microsoft Intune. Create a file directory with all four files present, you should have a directory like so:

Using the Win32 Content Prep Tool, run the following commands:

Once complete, you should have your Intunewim file.
Creating the Win32 App within Intune
Within the Intune Portal, browse to Apps, Windows and select Add:

Select Windows app (Win32):

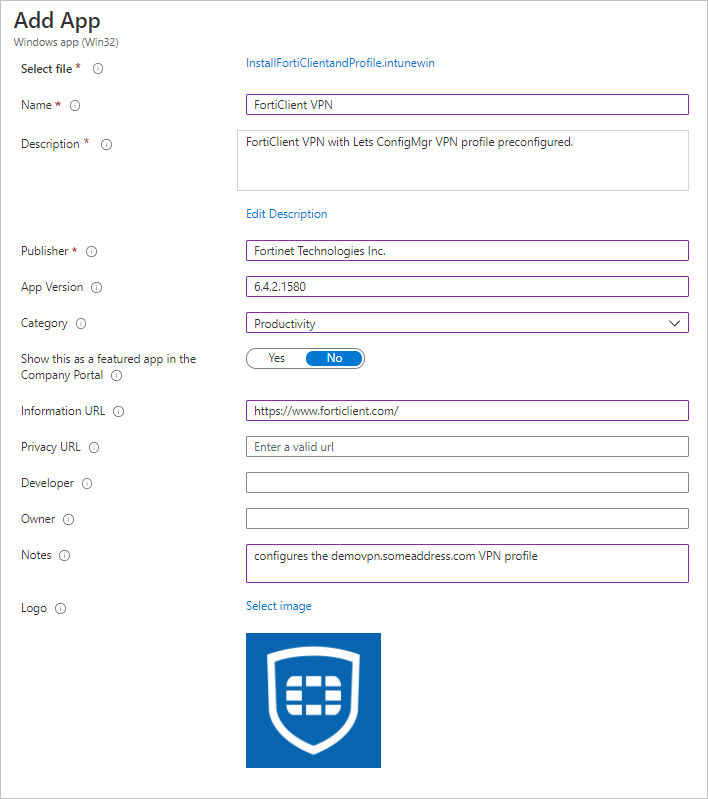
On the App Information page, upload your .intunewim file and enter in desired metadata, for example:
Under Program, enter in the following:
- Install command: powershell.exe -noprofile -windowstyle hidden -executionpolicy bypass -file .\InstallFortiClientandProfile.ps1
- Uninstall command: powershell.exe -noprofile -windowstyle hidden -executionpolicy bypass -file .\uninstallFortiClientandProfile.ps1
Leave the rest as defaults.
On the Requirements page, enter the following:

For the Detection rules, enter in the following:
| Setting Name | Value |
|---|---|
| Rule Type | File |
| Path | %ProgramFiles%\Fortinet\FortiClient |
| File or folder | FortiClient.exe |
| Detection method | String (version) |
| Operator | Greater than or equal to |
| Value | 6.4.2.1580 (Update this for the version that you are deploying) |
| Associated with a 32-bit app on 64-bit clients | No |
Like so:

No dependencies and assign the app to a test user \ device.
The Results
Once the FortiClient VPN has been deployed to the test device, the following should be in place.
FortiClient VPN Installed and present in the system tray and add \ remove programs:

FortiClient VPN profile preconfigured:

Successfully reporting as installed within MSIntune:

That’s how you can deploy FortiClient VPN with predefined VPN profiles via Microsoft Intune! Thanks for reading, until next time.


Hi,
I have vpn server in another port to default. I have to set the port 10443. ¿Where and how can I put my port in the installation script?
Thank you
Hi Nerea,
On this line: ‘New-ItemProperty -LiteralPath ‘HKLM:\SOFTWARE\Fortinet\FortiClient\Sslvpn\Tunnels\LETSCONFIGMGRVPN’ -Name ‘Server’ -Value ‘demovpn.someaddress.com’ -PropertyType String -Force -ea SilentlyContinue;’
Simply add your port the server value, so this is what mine would be if I had a port of 10443: ‘New-ItemProperty -LiteralPath ‘HKLM:\SOFTWARE\Fortinet\FortiClient\Sslvpn\Tunnels\LETSCONFIGMGRVPN’ -Name ‘Server’ -Value ‘demovpn.someaddress.com:10443‘ -PropertyType String -Force -ea SilentlyContinue;’
Hope this helps,
Alex.
Great document, very easy to follow along with. How would you go about troubleshooting installation issues?
I’ve tried testing on a device but it doesn’t seem to be installed. The error message I’m getting from Intune is 0x0 Unknown which isn’t very useful. Is there a log file somewhere that would help me out?
Hi Luke,
Thanks for your feedback, much appreciated.
I would always advise that you attempt to run the installation script on a test device manually before proceeding with Intune packaging to ensure all is well, but in terms of an Intune Win32 application log, this is located here: C:\ProgramData\Microsoft\IntuneManagementExtension\Logs . However, step 1, try manually running the Powershell script on a test device before proceeding with Intune app packaging.
Hope this helps,
Alex.
Hi Alex,
We’re trying to roll out the vpn client with intune and we’re running into a bit of a snag. We’ve downloaded the “VPN Only” installer from fortinet, and we’ve extracted the MSI, but when we install it, we end up with the ZTNA version. We’re just trying to install the free VPN Only version. I imagine there’s some sort of parameter that gets passed to the MSI to install the right version. I think things have changed with version 7. Do you have any advice?
Thanks,
Grant
Hi Grant,
Odd, I did deploy a v7 of the FortiClient the other week and all was well, I’ll have a look tomorrow and let you know by posting a comment here.
Thanks,
Alex
Hi Grant,
I’ve given this a shot this morning and all appears to be well, I’ve extracted the MSI and installed it manually, it’s showing as the VPN only version. Make sure to download the VPN-only version from this link: https://www.fortinet.com/support/product-downloads#vpn
Thanks,
Alex.
Hi Alex,
Thanks for your help. I’ve double checked with our Intune person and it does seem like we were extracting the wrong MSI 🙂
Sorry to bother you with this one.
-Grant
No problem Grant, glad you got it sorted.
Hi Alex,
Nice post!
Can I ask why you’re choosing a win32 application over a “line-of-business app”?
I ask this because I always choose “line-of-business” whenever I have an MSI at disposition.
Thanks in advance.
Kind regards,
Thibaud
Hi Thibaud,
Thanks and that’s a great question!
This is due to deploying applications via Autopilot, mixing LOB and Win32 applications aren’t recommended by Microsoft during the Autopilot process, this is due to two different engines in play and which can lock up the trusted installer process, thus causing an Autopilot build failure.
This is why I package all of my applications via Win32 regardless if they’re MSI or not.
Have a read of this: https://docs.microsoft.com/en-us/mem/intune/apps/apps-win32-app-management
“When you’re deploying Win32 apps, consider using the Intune Management Extension approach exclusively, particularly when you have a multiple-file Win32 app installer. If you mix the installation of Win32 apps and line-of-business apps during AutoPilot enrollment, the app installation might fail. The Intune management extension is installed automatically when a PowerShell script or Win32 app is assigned to the user or device.”
Hope this helps,
Alex.
Thanks for making me a wiser man today!
Cheers,
Thibaud
Thanks for the great write up, we already created the MST with the Tunnel connections embedded within it, using the Fortinet configuration tool
i just had the issue of how to bind the MST to the MSI for the autopilot install, so the non certificate connections would appear befofe logon, so we could then log into the devices with the VPN connected
the Powershell script did the trick
A great help
Thanks
Hi Martyn,
Thank you for your comments, I’m glad it helped!
Regards,
Alex.
Hi,
Is there any way to set the configuration to do IPsec VPN instead of SSL?
Hi Jordan,
I haven’t done this fully myself, but I’ve just taken a look at this, it appears that when an IPSec tunnel is created within the client, a registry key of ‘IPSec’ is created within HLKM:\Software\FortiNet location with various subkeys present, here’s an example of what was created within the registry after creating a dummy IPSec tunnel:
I would advise that you monitor the registry keys that are being created during manual IPSec tunnel setup, capture these and modify the PowerShell script for mass deployment.
Thanks,
Alex.
Hi Alex,
I’m interested to make an hybrid Autopilot device when it’s out side the local domain.
For it, is necessary that the VPN client be ready at the log on page for log on to the VPN before and them log on for autopilot process.
It’s possible to do this with the Forticlient Vpn client?
Thank for your work
Iñigo
Hi Inigo,
I haven’t done this myself but I’ve found this guidance on the matter: https://docs.fortinet.com/document/forticlient/6.2.0/administration-guide/479513/activating-vpn-before-windows-logon
Based on the above options I would recommend using process monitor from Microsoft sysinternals to see what registry keys were set and then build those additional registry keys into the deployment script or standalone powershell via Intune.
That being said, the elephant in the room here is Hybrid AD join, I strongly advise clients go down the Azure AD join route instead as it reduces the burden on required instructure and you’d be surprised with how much works with Azure AD, also bear in mind that Autopilot works a lot better in the Azure AD approach, my overall advice would be to use Azure AD until you can’t (which is very rare!!)
Best of luck,
Alex.
hi,
very good information. In my case when i have configured vpn manually, i see also data1 and data2 registry setting. Where data1 has very long string value. But in yours example you dont make those reg values. I wonder that purpose, if it is a unique value that should not be distributed to all devices, like crypt key? Also secondd question is why you use mst-file?
Hi Janne,
In terms of settings deployment on mass, I have not found that the Data1 or Data2 keys don’t need to be included in the script as they don’t seem to have any impact on the resultant settings. In terms of MST, I use this to remove the desktop shortcut, I like to have a clean desktop when deploying applications for clients.
Thanks,
Alex.
Hi – I was testing the uninstall process and noticed that the profile removed, but not the agent. Did I miss something in the post?
Hi Levi,
I suspect this is due to the MSI product code changing on the version that you are deploying. If you update the uninstall script with the latest product code then then should resolve the issue.
Thanks,
Alex.
Hi,
the location of .msi file in my test is here:
C:\ProgramData\Applications\Cache\{5EB98A24-BFFA-4433-81CF-A496861CC299}\7.0.1.0083
I found that on the file log “FCTInstall.log” in the folder “C:\Users\user\AppData\Local\Temp” after the first installation of file .exe.
hope it is useful for you.
AC
Thanks for sharing.
Will this work in Auto Pilot situation?
Hi Michael,
Not sure if I understand the question. Are you referring to using this for Hybrid AD join? If so, no this exact example won’t work as it does not include prelogon VPN settings. If you’re referring to simply deploying the Forticlient application then yes, it doesn’t make a difference via Autopilot or not, it’s the same intune process regardless.
Thanks,
Alex.
Is there a way to bypass the “Welcome to FortiClient VPN!” I accept screen, or have it pre check the checkbox:
https://i.imgur.com/nH4nqwu.png
Hi there,
Yes, it’s possible. The registry key that removes the disclaimer is within the user’s registry and has references to the version that FortiClient is deploying:
I haven’t had a chance to work this out fully, but if you can add version variable to a script and then add the registry key to the default and \ or users registry locations then it should do the trick, let me know how you get on!
Thanks,
Alex.
Hi Alex,
Is it possible to have multiple Fortinet VPN Profiles included in the installation script? We use multiple global access points within the business.
Many Thanks,
Warren
Hi Warren,
Yep, aboustely possible. All you’d need to do is double up on the registry entries really, so here is a script to deploy two VPN profiles:
# Restart Process using PowerShell 64-bitIf ($ENV:PROCESSOR_ARCHITEW6432 -eq "AMD64") {
Try {
&"$ENV:WINDIR\SysNative\WindowsPowershell\v1.0\PowerShell.exe" -File $PSCOMMANDPATH
}
Catch {
Throw "Failed to start $PSCOMMANDPATH"
}
Exit
}
# Install FortiClient VPN
Start-Process Msiexec.exe -Wait -ArgumentList '/i FortiClientVPN.msi TRANSFORMS=FortiClientVPN.mst REBOOT=ReallySuppress /qn'
# Install VPN Profile 1
if((Test-Path -LiteralPath "HKLM:\SOFTWARE\Fortinet\FortiClient\Sslvpn\Tunnels\LETSCONFIGMGRVPN") -ne $true) { New-Item "HKLM:\SOFTWARE\Fortinet\FortiClient\Sslvpn\Tunnels\LETSCONFIGMGRVPN" -force -ea SilentlyContinue };
New-ItemProperty -LiteralPath 'HKLM:\SOFTWARE\Fortinet\FortiClient\Sslvpn\Tunnels\LETSCONFIGMGRVPN' -Name 'Description' -Value 'Lets ConfigMgr VPN' -PropertyType String -Force -ea SilentlyContinue;
New-ItemProperty -LiteralPath 'HKLM:\SOFTWARE\Fortinet\FortiClient\Sslvpn\Tunnels\LETSCONFIGMGRVPN' -Name 'Server' -Value 'demovpn.someaddress.com' -PropertyType String -Force -ea SilentlyContinue;
New-ItemProperty -LiteralPath 'HKLM:\SOFTWARE\Fortinet\FortiClient\Sslvpn\Tunnels\LETSCONFIGMGRVPN' -Name 'promptusername' -Value 1 -PropertyType DWord -Force -ea SilentlyContinue;
New-ItemProperty -LiteralPath 'HKLM:\SOFTWARE\Fortinet\FortiClient\Sslvpn\Tunnels\LETSCONFIGMGRVPN' -Name 'promptcertificate' -Value 0 -PropertyType DWord -Force -ea SilentlyContinue;
New-ItemProperty -LiteralPath 'HKLM:\SOFTWARE\Fortinet\FortiClient\Sslvpn\Tunnels\LETSCONFIGMGRVPN' -Name 'ServerCert' -Value '0' -PropertyType String -Force -ea SilentlyContinue;
# Install VPN Profile 2
if((Test-Path -LiteralPath "HKLM:\SOFTWARE\Fortinet\FortiClient\Sslvpn\Tunnels\LETSCONFIGMGRVPN2") -ne $true) { New-Item "HKLM:\SOFTWARE\Fortinet\FortiClient\Sslvpn\Tunnels\LETSCONFIGMGRVPN2" -force -ea SilentlyContinue };
New-ItemProperty -LiteralPath 'HKLM:\SOFTWARE\Fortinet\FortiClient\Sslvpn\Tunnels\LETSCONFIGMGRVPN2' -Name 'Description' -Value 'Lets ConfigMgr VPN 2' -PropertyType String -Force -ea SilentlyContinue;
New-ItemProperty -LiteralPath 'HKLM:\SOFTWARE\Fortinet\FortiClient\Sslvpn\Tunnels\LETSCONFIGMGRVPN2' -Name 'Server' -Value 'demovpn2.someaddress.com' -PropertyType String -Force -ea SilentlyContinue;
New-ItemProperty -LiteralPath 'HKLM:\SOFTWARE\Fortinet\FortiClient\Sslvpn\Tunnels\LETSCONFIGMGRVPN2' -Name 'promptusername' -Value 1 -PropertyType DWord -Force -ea SilentlyContinue;
New-ItemProperty -LiteralPath 'HKLM:\SOFTWARE\Fortinet\FortiClient\Sslvpn\Tunnels\LETSCONFIGMGRVPN2' -Name 'promptcertificate' -Value 0 -PropertyType DWord -Force -ea SilentlyContinue;
New-ItemProperty -LiteralPath 'HKLM:\SOFTWARE\Fortinet\FortiClient\Sslvpn\Tunnels\LETSCONFIGMGRVPN2' -Name 'ServerCert' -Value '0' -PropertyType String -Force -ea SilentlyContinue;
All the best,
Alex.
That worked great, the only issue I’m having is being able to deploy this to HKCU regardless of who the current user is.
“`
$registryPath = “HKCU:\SOFTWARE\Fortinet\FortiClient\FA_UI\VPN-7.0.2.0090\”
$Name = “Installed”
$value = “0x61773bfe”
Set-ItemProperty -Path $registryPath -Name $name -Value $value -Type DWORD -Force | Out-Null
“`
This seems to do the trick, but would be useful if I could make it work for any user, not just the user that the initial deployment was sent to.
Have a look into Master Packager, they have an option to push out HKCU registry keys to all users:
Thanks,
Alex.
Hello Alex,
Thanks for the great article. Just one question maybe you know the answer.
We are using SAML logon, is it possible to configure the PowerShell script that the options “Enable Single Sign On (SSO) for VPN Tunnel” is automatically checked while publishing the profile?
Thanks in advanced!
Rene
Hi Rene,
Thanks for your comments! Yes, this is possible. You’d need to deploy this DWORD registry key:
Path: HKEY_LOCAL_MACHINE\Software\Fortinet\FortiClient\Sslvpn\Tunnels\*VPN Profile Name*
DWORD: sso_enabled
Value: 1
Example PowerShell line to ADD to your installation script:
HKLM:\SOFTWARE\Fortinet\FortiClient\Sslvpn\Tunnels\LETSCONFIGMGRVPN’ -Name ‘sso_enabled’ -Value 1 -PropertyType DWord -Force -ea SilentlyContinue;
Thanks and Merry Christmas,
Alex.
Thanks for this great doc. will you know the command to add to ”
Preferred DTLS Tunnel” feature please ?
Thank you!